FREE Pattern! Messy Bun Toque

img_1434

Supplies:

Yarn:

  • Any super bulky weight yarn. I used 1 skein of Thick & Quick
  • N size crochet hook

Instructions:

Note: at the end of each round, slip stitch to the first stitch from the roun. 

Note: ch at beginning of round does NOT count as a stitch. 

Chain 15

Being careful not to twist, join to make a circle.
Round 1: ch 2, *2dc, dc in next 2* repeat around (20)
Round 2: Ch 2, *2dc, dc in next 3* repeat around (25)
Round 3: Ch 2, *2dc, dc in next 4* repeat around (30)
Round 4: Ch 2, *2dc, dc in next 5* repeat around (35)
Round 5: Ch 2, *2dc, dc in next 6* repeat around (40)
Rounds 6 – 11: ch 2, dc around (40)
Round 12: ch 1, sc around (40)

Finish off and weave in ends.

img_1431img_1432


FREE PATTERN: Cabled Legwarmers

Legwarmers. Remember when they used to be for 80’s fitness videos with those super high cut body suits?

Well they’re back. With a vengeance. Everyone from dancers to yogis to every day people want a pair.

I had looked around at patterns but, as is sometimes the case, I just didn’t find anything that I LOVED.

So I made my own pattern.

Legwarmers3

Because I had never made these before I didn’t know exactly how much yarn I would need. As a result I opted to make the cuffs a different colour so that I would be safe. I didn’t want to use a colour that would detract from this stunning hand dyed yarn so white it was.

Hand dyed yarn is from the amazingly talented Allison Barnes Collection.

Without further ado I present to you the Cabled Legwarmer.

Supplies needed:
Size 8 (5.0mm) DPNs OR Long Circular for Magic Loop (which is what I used)
Worsted Weight Yarn – Roughly 250yards
Cable needle or DPN to hold your yarn for cables

Legwarmer2

Cable Row:

Knit 17, Purl 1, CB6F, CB6B, Purl 1, Knit 17

CB6F = Place 3 stitches on your cable needle and hold to front. Knit next 3 stitches. Bring your cable needle back and knit the 3 stitches off your cable needle.
CB6B = Place 3 stitches on your cable needle and hold to back. Knit next 3 stitches. Bring your cable needle back and knit the 3 stitches off your cable needle.

Legwarmers4

Cast on 48 stitches.

If you’re using DPNs, arrange on 3 needles. If you’re using Magic Loop, split into 2 groups.

Rows 1-15: Rib k2, p2 around

Body of Legwarmers:

If you are changing colours now is the time.

Row 1: K17, P1, K12, P1, K17
Row 2: Repeat Row 1
Row 3: Repeat Row 1
Row 4: Repeat Row 1
Row 5: Cable Row (K17, P1, CB6F, CB6B, P1, K17
Row 6: Repeat Row 1
Row 7: Repeat Row 1
Row 8: Repeat Row 1
Row 9: Repeat Cable Row

Repeat rows 2-9 until desired length

I knit until my leg warmer reached around 15″ from the beginning of the ribbing.

If your ribbing is in a different colour, now is again the time to switch.

Rib k2, p2 for 7 rows or desired length.

Bind off in rib.

And voila! Beautiful ribbed leg warmers 🙂

Enjoy!

*Copyright Shanti Knits 2015. You are welcome to sell items made from this pattern but I would really appreciate pattern credit on etsy or wherever else you sell. You are NOT welcome to repost this pattern or claim it as your own.*

Legwarmers1

FREE PATTERN: Coffee Cup Cozy

I love coffee.

That’s actually probably an understatement.

I drink exactly one cup a day. On rare occasions I have a second cup. But my one cup a day makes me so happy. My favourites are Tofino Roast and North Mountain. One from each coast of Canada.

But I digress.

At Christmas I got a spindle. The beauty of fiber craft is that all the old is coming back to be new again. Drop spindles. Spinning wheels. What was one something only grandmothers did, children, teens and adults are picking up the craft.

I only learned to crochet in December 2012. I wanted to make a hat.

Since then I’ve made hundreds of items. I’ve picked up knitting. And spinning. I’ve become picky about yarns.

So I picked up this fleece from Fleece Artist at my Local Yarn Store – Pam’s Woolley Shoppe.

And then I spun it.

IMG_4356 IMG_4358

IMG_4362

Then my daughter and I wound it and I plied it (i.e. I respun it holding it double twisting the other way to make it into yarn.

I washed it, tied it, hung it out to dry.

IMG_4366 IMG_4367IMG_4369

So the yarn wasn’t perfect. But it was awesome. There were parts I wasn’t thrilled with. But overall.. overall I’m SO happy with it!

IMG_4374 IMG_4375 IMG_4376

Plus I love the pattern I made for the cup cozy so I decided to share it with you.

Waffled Cup Cozy

Materials Needed:
Size 13/9mm needles
Super Bulky Weight yarn – this takes very little yarn so scraps are great!

Using whatever method you prefer, cast on 9 stitches.

Row 1: K3, P3, K3
Row 2: P3, K3, P3
Row 3: K3, P3, K3
Row 4: P3, K3, P3

Row 5: P3, K3, P3
Row 6: K3, P3, K3
Row 7: P3, K3, P3
Row 8: K3, P3, K3

Repeat Rows 1-8 for 8”

Cast off.

Putting wrong sides together (whichever side you desire!), whip stitch closed.

Sew in all ends and voila! Cup cozy extraordinaire!

You are more than welcome to sell anything made from this pattern but I would love some credit! You are not permitted to pass this pattern off as your own.

FREE Pattern! Minecraft Fingerless Gloves

My son is obsessed with Minecraft. I really don’t understand the point of the game, but he seems to have fun playing it (in very limited quantities). As it’s still cold in the mornings here, I figured it was a good time to make him his own pair of Fingerless Gloves. I designed the pattern in the morning, knit them up while he was at school, and presented them to him when he got home. To say that he was happy is a gross understatement.

Of course, I had to share the pattern with you.

Fits roughly ages 5-12.

IMG_3846-edit

Supplies:

Yarn:

  • Green, Dark Brown, Light Brown and Black worsted weight yarn (I used Vanna’s choice but the sky’s the limit!)
  • Size 8 DPNs (5.0mm) and a darning needle

First mitt: The Dirt Block

IMG_3841-edit

Cast on 32 in light brown

Rows 1-12: K2 p2 ribbing
Row 13-14: knit around

Switch to Dark Brown

Row 15: knit

Start to Shape Thumb:

Row 16: K2, pm, kfb, k2, kfb, pm, k to end
Row 17: Knit
Row 18: K2, sm, kfb, k4, kfb, sm, k to end
Row 19: Knit
Row 20: K2, sm, kfb, k6, kfb, sm, k to end
Row 21: K2, slip 10 stitches onto scrap yarn, cast on 4 using back loop, k to end
Rows 22-28: Knit around

Starting colorwork: (switching to green as necessary)

dirtblock

Rows 29-33 as above (you will repeat the colorwork twice)

Rows 34-35: K2, p2 around

Bind off and weave in ends.

Second Mitt: The Creeper

IMG_3845-edit

Using Green, Cast on 32

Rows 1-12: K2 p2 around
Rows 13-15: K around

Start shaping thumb

Row 16: K2, pm, kfb, k2, kfb, pm, k to end
Row 17: K around
Row 18: K2, sm, kfb, k4, kfb, sm, k to end
Row 19: K around
Row 20: K2, sm, kfb, k6, kfb, sm, k to end
Row 21: K2, slip 10 stitches onto scrap yarn, cast on 4 using back loop, k to end (this is the first row of the colorwork)

Continuing colorwork as below:

creeper

Row 22-32 K8, proceed with colorwork as above, k to end for next 11 rows

Rows 33-34: K2, P2 around

Bind off and weave in ends.

Thumbs:

Creeper mitt use green; dirt block use dark brown.

Pick up 10 stitches from scrap yarn and as many stitches as you want from the other half of the mitt.

Row 1: Decrease stitches as you want until you have 12 stitch on your needle.

Row 2: Knit

Row 3: K1P1 around

Bind off loosely.

Happy boy 🙂

IMG_3848-edit

Granny Style French Press Cozy

I have an obsession.

Coffee.

I love coffee. I prefer darker roasts. It started when I was pregnant with my 2nd and exhausted all the time. I started getting coffee before work. Then my daughter was born and every time I drank coffee she screamed. Until she was 8 months old.

Miraculously after that I was able to start drinking coffee again. I became a bit of a coffee snob – no longer could I drink cheap coffee. Instead, I had to drink top quality. And that hasn’t changed even 7 years later.

My favourites are Tofino Roast and North Mountain Roast – interestingly enough from each coast of Canada!

Enter my second obsession – working with yarn.

I couldn’t find a coffee cozy that was just right so instead of I made my own. (I’m not type A or anything…) And then I decided to share it with all of you.

IMG_3718

Granny Style French Press Cozy

Materials:
I hook
Worsted weight yarn – about 30-50 yards of each colour.

Instructions:

Ch 31

Row 1: In 3rd chain from hook dc 3 in stitch.* Skip 2. 3dc.* Repeat from * to * until end of row. (10 clusters)

Row 2: Ch 3, Work 3dc in each space between clusters, Dc in ch 3 from previous row. (9 clusters)

Row 3: ch 3, word 3 dc between first ch 3 and cluster and then between each cluster after that. (10 clusters)

Repeat Row 2 and Row 3 until you’ve reached desired height. (Roughly 10 rows or approximately 5 inches)

I alternated colours every 2 rows.

Attaching a new colour if you want for the border:

Row 11: sc all around with 2 sc in each corner. (I had 29 across the widest edge, 15 sc down each side – basically one sc in the ch 3 and 2 sc in the dc of each colour)

Row 12: Work the border of your choice.  I used this simple border except I used tr stitch instead of dc. Slip stitch to connect.

IMG_3713 IMG_3714 IMG_3715

The treble stitches will be in front. Slide the stitch over towards the back, creating a bit of a puff in the front.

Ch 5 and slip stitch to the opposite corner (this will be the little over hang above the handle).

IMG_3719

Finish off.

At the other bottom corner, attach yarn and ch 16. Slip stitch back along the ch. Repeat on opposite corner (ties for under handle.)

Repeat for another set of ties in the middle if desired.

Weave in all the ends, wrap around your French press and enjoy hot coffee!

IMG_3720

baby kimono FREE pattern

I pay for patterns sometimes. If there’s something I really want to make and I have no idea how to go about it, I will for sure go out and pay for the pattern. But then other times…

So I’ve made a few kimonos for newborns and then the pattern I used went from free to $6.95. Now, that’s fine, but I just can’t imagine paying for that.

So I made my own. And I’m keeping it free.

Thanks to feedback over the last while, I’ve included a video of how to increase! Also, there was an error on row 2 – it used to say hdc 9 in the middle portion, but it’s actually 10!

Without further ado… here’s the pattern!

IMG_3474

Materials needed:
H hook
Worsted weight yarn – about 150 yards + a small amount of contrast yarn if wanted.

Notes:
* ch 1 at the beginning of the row does not count as a stitch
* I don’t make a hole in the pattern for the tie to feed through because I feel like there’s enough space between stitches to do this.
* Gauge – 9 rows & 12 stitches – roughly 4″
* When you are going to do the hdc-ch1-hdc, you skip the first hdc, then hdc-ch1-hdc in the ch1 space, then hdc in the next hdc. If you don’t skip the first hdc, you’re going to end up with waaaayyyyy too many stitches.

Yolk:

Ch 31
Row 1: hdc in 2nd ch from hook, hdc across (30)
Row 2: Ch 1, 2hdc in first stitch, hdc-ch1-hdc in 2nd stitch, hdc in next 7 , hdc-ch1-hdc  in next, hdc in next 10 , hdc-ch1-hdc, hdc in next 7 , hdc-ch1-hdc in 2nd last stitch, 2hdc in last stitch (36)
Row 3-13: ch 1, 2hdc in first stitch, *hdc up until ch 1, hdc-ch1-hdc in the ch 1 space*, repeat until last stitch, 2hdc in last stitch (increasing  by 6 each row)

At the end of the 13th row you should have a total of 102 stitches.

If you want to check your work it should go:
Row 3: 42, Row 4: 48, Row 5: 54, Row 6: 60, Row 7: 66, Row 8: 72, Row 9: 78, Row 10: 84, Row 11: 90, Row 12: 96, Row 13: 102

IMG_3476

Armhole forming:

Row 14: ch 1, 2hdc in first stitch, hdc until ch1 space – yarn over, slip hook into first ch 1, slip hook into next ch-1, complete hdc (first armhole made),  hdc until ch1 space – yarn over, slip hook into first ch 1, slip hook into next ch-1, complete hdc (second armhole made), hdc to last stitch, 2hdc in last stitch.

You’ve formed both arms and you will now be working on the back and lengthening each side to create the wrap section.

IMG_3475

Row 15-21: 2hdc in first, hdc across, 2hdc in last.

Fasten off and weave in ends.

Sleeves:

Row 1: Ss in stitch under armpit. With right side facing, hdc around. (21)

Rows 2-12: ch 1, hdc around, ss to first chain. (Arms will be roughly 6″ in length)

Repeat for second sleeve.

IMG_3479

Contrast colour:

Attach a contrast colour to the end of a sleeve and sc around. Slip stitch to first stitch. Fasten off & weave in ends. Repeat on other sleeve.

Attach yarn to one corner.

Ch 1, Sc around front of kimono. When you reach the next corner, chain 30, slip stitch back along the chain (this is your first tie). Continue with sc along back of sweater. When you come to the other corner (where you started), chain 30, slip stitch back along the chain, slip stitch to first chain. Fasten off and weave in ends.

IMG_3477

You will still need to make the ties on the sides. I don’t make a hole in which to thread the ties through because I find that I have enough room with hdc stitch. I thread the tie through one side and then attach the contrasting yarn at that stitch, chain 30, slip stitch back, slip stitch to attachment and fasten off.

IMG_3478

For the opposite side you can eyeball it to determine where the tie will sit.

And voila! Kimono!

I kindly ask that you give me credit if you use my pattern and that you don’t use my pattern as your own.

Enjoy!

Yoda Hat Pattern

I had really wanted to make my little man a yoda hat. Mostly because he kept asking me for one. I searched and search and although there are some fantastic patterns out there, I just didn’t find one that I liked. So I made my own. And I’m SUPER happy with how it turned out. I’m all for making my patterns free so here we go!

This hat in specific fits roughly a 5-10 year old but you can use the ears on any size hat!

FullSizeRender (1)

Materials Needed:
Bulky weight yarn (number 5) – About 140-150 yards.
J (6.0) hook
Needle

Directions:

Hat:
Magic Ring – make 7 hdc in magic ring (7)
(*If you don’t know how to make a magic ring, then ch 2 and hdc 7 in the 2nd chain from hook.)
Join with a ss.
At the beginning of every row I ch2 and start my first stitch in the same stitch as the ch2. At the end of every row I slip stitch to the first stitch. This creates an invisible seam – or more invisible than other ways anyway!
Row 2: ch 2, 2hdc in each stitch (14)
Row 3: ch 2, *2 hdc in first stitch, hdc in next stitch*. Repeat from * to * around. (21)
Row 4: ch 2, *2 hdc in first stitch, hdc in next 2 stitches*. Repeat from * to * around (28)
Row 5: ch 2, *2 hdc in first stitch, hdc in next 3 stitches*. Repeat from * to * around (35)
Row 6: ch 2, *2 hdc in first stitch, hdc in next 4 stitches.* Repeat from * to * around (42)
Row 7: ch 2, *2 hdc in first stitch, hdc in next 5 stitches.* Repeat from * to * around (49)
Row 8-16: ch 2, hdc around (49)
Row 17: ch 1, sc around (49)
Fasten off and weave in ends.

Ears (make 4):

FullSizeRender

sc dec = sc decrease – insert hook into first stitch, pull yarn through, insert hook into second stitch, pull yarn through, yarn over and pull through all 3 stitches.
I ch 1 at the beginning of each row but it does not count as the first stitch.
Ch 8
Row 1: sc in 2nd ch from hook and in each across (7)
Row 2: sc across (7)
Row 3: sc in first 3, 2sc in next, sc in last 3 (8)
Row 4: sc in first 4, 2sc in next, sc in last 3 (9)
Row 5-7: sc across (9)
Row 8: sc in first, sc dec, sc across (8)
Row 9: sc across (8)
Row 10: sc in first, sc dec, sc across (7)
Row 11: sc in first, sc dec, sc across (6)
Row 12: sc in first, sc dec, sc across (5)
Row 13: sc in first, sc dec, sc across (4)
Row 14: sc in first, sc dec, sc across (3)
Row 15: sc in first, sc dec(2)
Row 16: sc dec (1)

Finish off.

Take 2 ears and place them back to back. Starting at the bottom right corner, sc all the way around the ear making sure you are going through both ears. This makes the ears thicker and sturdier so that they don’t flop all over the place.

Once you get to the bottom left corner, leave a long tail (about a foot) to use to sew on to hat.

Repeat with the other 2 ears.

Place the ears on each side (I sewed on my ears between rows 8-13) and sew on to hat. Feel free to put a bit of a curve into the ears.

Sew in all the ends and voila! Yoda!

Please feel free to sell anything made from this pattern but please DO NOT sell the pattern as your own or copy it unless you have written permission from me. If you are selling on etsy or somewhere else, I would love a link back to my pattern.

Don’t hesitate to ask me any questions or let me know if something isn’t clear!

Happy hooking!

IMG_2689

fancy everyday beanie

Well let’s be honest. I’m pretty brutal at posting but I have a new post and a new pattern for you!

The Fancy Everyday Beanie is a quick and easy crochet and looks super awesome!

photo 6

Materials:
Worsted weight yarn
I hook (5.5)

Notes:

I work in the round joining each round to the next with a slip stitch. I chain 2 at the beginning and hdc in the same stitch. This creates a bit of a hidden seam.

Directions:

Magic Circle 8 hdc
Row 2: 2hdc in each stitch (16)
Row 3: *2hdc in first stitch, hdc in next*, repeat from * to * around (24)
Row 4: *2hdc in first stitch, hdc in next 2*, repeat from * to * around (32)
Row 5: *2hdc in first stitch, hdc in next 3*, repeat from * to * around (40)
Row 6: *2hdc in first stitch, hdc in next 4*, repeat from * to * around (48)
Row 7: *2hdc in first stitch, hdc in next 5*, repeat from * to * around (56)
Row 8: *2hdc in first stitch, hdc in next 6*, repeat from * to * around (64)
Row 9-12: hdc around (64)
Row 13: ch 3, dc in same stitch. *skip 2, in next stitch 2dc, ch1, 2dc*, repeat around until 3 stitches left. IN last stitch 2dc ch 2, slip stitch to 3rd chain in starting.
Row 14: hdc around (64) *Note that in order to get 64 around you basically need to not hdc in the chains.
Row 15: Repeat row 13.
Row 16: hdc around (64)
Row 17-19: sc around (64)

Feel free to add a flower, or a skull, or some other funky addition to the hat!

photo 4photo 5

Salad in a Jar – Go Big or Go Home

Anyone who knows me knows that I’m not so good at the whole “half-ass” thing. I tend to throw my everything into whatever I’m doing and even though it might bomb heavily, I’m going to go for it.

And such went the whole Salad in a Jar experiment.

You see, I’m heading down to Calgary for a weekend of teacher training – prenatal training to be specific. I’m staying with a friend of mine and she’s amazing, but I didn’t want to subject her to my food stuff. I know she’ll provide me with wonderfully nutritious food but I’m going to have to pack lunches (and in some case suppers) and I didn’t want her to have to try to feed me for 7 meals. So I started looking. And then it’s like this giant lightbulb went off. Salad in a jar!

I made 9 jars. There are 6 different types of salad. And I’m going to tell you what I put in all of them.

First of all, making salad in a jar isn’t for the faint of heart. This is what my kitchen looked like partway through the process.

Image Image

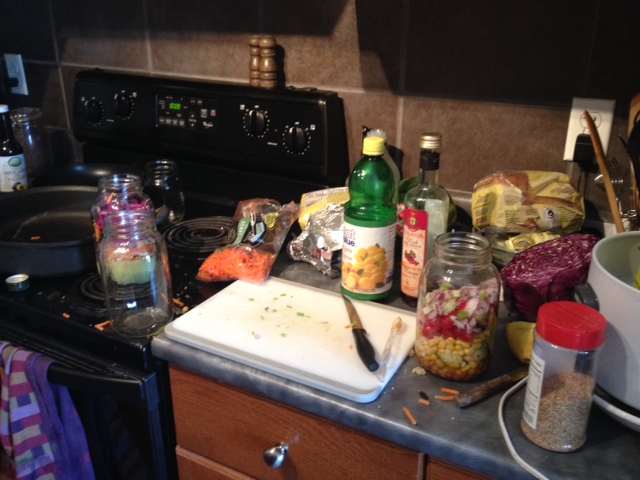
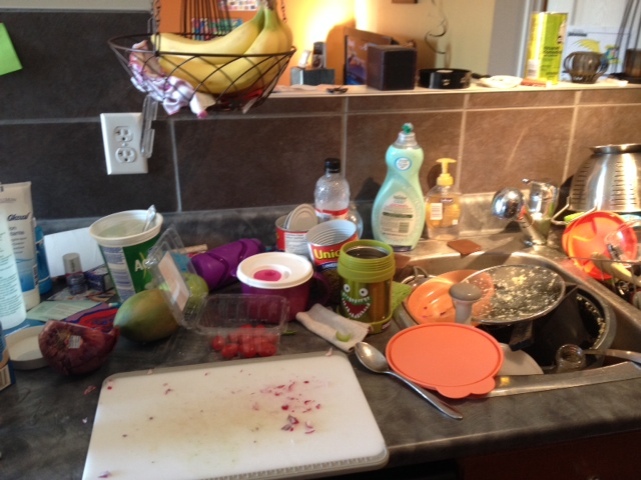
Now granted, I have an extremely small kitchen. But still.

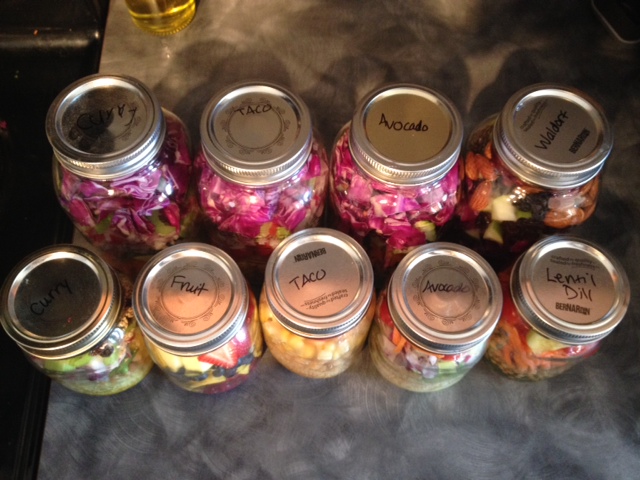
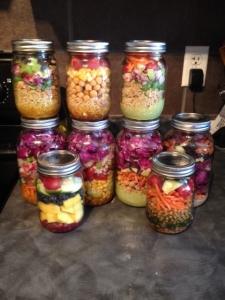
However, this was the final result:

Image

My little guy was all about helping. And once I started cutting fruit he was SUPER into it.

So without further ado, here are some recipes. And know a few things: One- I love red cabbage and really dislike traditional lettuce. Two – I wanted these to be vegan if I could. Three – You can change them up using your favourite stuff!

Salad dressing base used for Taco and Curry:
1/2 cup olive oil
1/3 cup vinegar of some kind (I used red wine vinegar)
1/2 tsp salt
dash of lemon juice

This dressing made enough for 4-5 jars. I split it up fairly evenly.

Taco – I made one using quinoa, one using traditional salad ingredients.
Add 1 tsp of taco seasoning (I used epicure) and stir it up.

Quinoa version:
Add 1/2 cup of quinoa.
Layer in the following order: 1/4 cup of chickpeas, Corn, Red Tomatoes (not cut)

Salad version:
Layer in the following order: Cucumber, Corn, Red Tomatoes (not cut), Red onion, celery, radish, Top with red cabbage

Curry – I made one using quinoa, one as salad
Add 1 tsp of curry powder and stir it up.

Quinoa Version:
Add 1/2 cup of quinoa.
Layer in the following order: Snap peas, Radish, red onion, celery, 2 tbsp. raisins, sesame seeds

Salad version:
Layer: Shredded carrot, zucchini, Red onion, radish, Cabbage

photo 3

Avocado:
I used the salad dressing found here: Lemon Avocado Salad Dressing

I split the dressing between 2 jars.

Quinoa Version: 1/2 cup quinoa, Green snap peas, Red Onion, Radish, Celery, Red tomatoes (not cut), Shredded carrot

Salad version: Chick peas and lentils (totalling 1/3 cup), Shredded carrot, zucchini, Red cabbage

Waldorf Salad: I used the basics of the salad that can be found at Produce by Amy

I used a similar dressing but this is my only non-vegan option as I used Hellman’s Mayonnaise. This is my only non nut-free salad as well.

Dressing: 2 tbsp. mayonnaise, 2 tbsp. lemon juice, 1 tbsp. avocado oil, 1/4 cup apple cider vinegar. Place on bottom of jar.

Layer: Shredded carrot, Red cabbage, Red onion, Green Apple, 2 tbsp. almonds, 2 tbsp. pomegranate.

Lentil Salad:
Layer: Dressing (2 tbsp. avocado oil, 1 tbsp. red wine vinegar, splash of lemon juice, 2 tsp dill), 1/2 cup lentils, Shredded carrots, red tomatoes (not cut), cucumber

And finally, I wanted something to snack on during the long days of training so I made a simple fruit jar by layering pomegranate seeds, mango, blueberries, green apple and strawberries.

And voila. Now I have to decide which 4 to bring with me..

photo 4
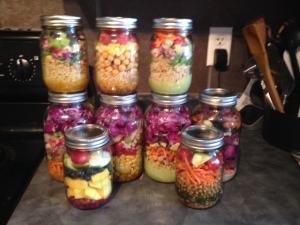
Starting at the Top left going clockwise: Quinoa Curry, Quinoa Taco, Quinoa Avocado, Waldorf, Lentil, Salad Avocado, Salad Taco, Fruit, Salad Curry

Bon apetit!

Kids Newfoundland Mittens – Free Pattern

2014-01-10 14.40.51I searched and searched and just couldn’t find a pattern that I was satisfied with for these little mittens. There are some really amazing patterns out there for these mittens, but none that I could find for chunkier wool for kids. So, I made my own up.

These mittens were commissioned by a 5 year old. He bought them with his own money. Now, tell me that isn’t cool! He picked the colours and requested that they have a tie on them so he could put them into his jacket.

So I went with it. And I plan to make lots more. Well, maybe not lots, but a few more anyway.

Feel free to use this pattern at your leisure! I just ask that you not sell this pattern or claim it as your own. You’re welcome to sell whatever you make from this pattern though but if you sell online, I’d love some credit!

Fits children roughly 3-72014-01-10 14.40.44
Needles: Size 5mm DPNS
Wool: Any worsted weight yarn of your choosing using 2 strands at a time (double width) *side note – if making mittens for kids, think washable!!

Abbreviations:
K – knit
P – purl
Cluster 1 – *K4, slip next 2 stitches purl wise, repeat from * around (you will have 5 clusters). Repeat 4 more times for a total of 5 rows.
Cluster 2 – *K1, slip next 2 stitches purl wise, K3, repeat from * around (you will have 5 clusters). Repeat 4 more times for a total of 5 rows.

Cast on 20 stitches and spread relatively evenly over 3 needles

Ribbing:
K1P1 (or K2P2 if you want) for 2.5 inches

Mitten:
Row 1: Purl adding 5 stitches evenly throughout (25)
Row 2: Purl adding 5 stitches evenly throughout (30)
Rows 3-7: Cluster 1
Rows 8-9: Purl around
Rows 10-14: Cluster 2
Row 15: Purl around
Row 16: P2, slip next 6 stitches onto stitch marker (or scrap of yarn), cast on 6 stitches, purl remaining stitches
Rows 17-21: Cluster 1
Rows 22-23: Purl around
Rows 24-28: Cluster 2
Rows 29-30: Purl around
Rows 31-35: Cluster 1
Rows 36-37: Purl around
Row 38: K4 k2tog around
Row 39: K around
Row 40: K3 k2tog around
Row 41: K around
Row 42: K2 2tog around
Row 43: K around
Row 44: K1 k2tog around
Row 45: K
Row 46: K2tog around
Cut yarn and using a darning needle thread through the remaining stitches and thread into inside of mitten.

Thumb:
Use 2 DPNs for the stitches (it makes it less clunky in my opinion *thanks for the tip Emily!!*)
One the first DPN transfer 5 of the stitches from your stitch holder.
On 2nd DPN transfer the last stitch then pick up as many stitches as you want from the other side to form the thumb.
Row 1: K around
Row 2: K around starting to reduce the stitches – to reduce K2tog – try to get down to about 12 stitches
Row 3: K around reducing to a total of 8 stitches
Rows 4-12: K around
Row 13: K2tog 4 times

Using a darning needle thread through the remaining 4 stitches and thread through to inside.

Turn your mitten inside out and weave in all your ends.

Voila! Kids newfoundland mittens!

2014-01-10 14.40.47

 Sam with his new mittens!

2014-01-10 15.15.43

Previous Older Entries